android講座 GPS取得,Google API
androidにはGPSセンサーがついています。これを利用すると現在位置を取得できます。これを利用して、歩いている場所の住所を次々に表示するアプリを作ります。
これを応用して、緊急事態に巻き込まれたときに、自宅の地図を出す、家に電話する、メールを送るなどのことができるアプリを作って見ましょう。
まずは、GPSをgooleのplay-services-locationライブラリーを作った操作するところを作ります
ライブラリーの追加まずは、MainActivityをEmpty画面で作成します。そして、googleのライブラリーを追加します。
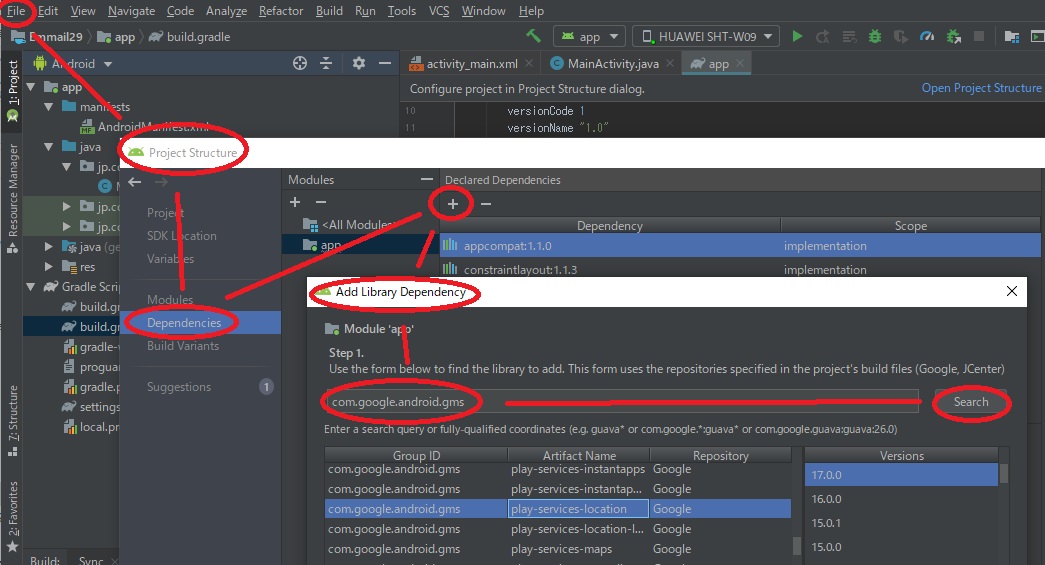
今回は17.0.0でしたが、最新のものを使ってください。
権限の追加AndroidManifestを開いて次の3つの権限を追加してください
<uses-permission android:name="android.permission.ACCESS_FINE_LOCATION"/>
<uses-permission android:name="android.permission.ACCESS_COARSE_LOCATION"/>
<uses-permission android:name="android.permission.INTERNET"/>

<application
この権限を宣言しないと、androidはその資源の使用を認めません。またバージョン23以降は、この宣言がしてあっても、1回目の実行開始時に、もう一度その資源の使用をするか聞くようになりました。そこで認められないと実行できません。
その部分は自分でコーディングしないといけませんが、ガイドがでるのでわかりやすくなっています。のちほど説明します。
画面を作成するactivity_main.xmlに画面を作成します。constrainLayoutをreletiveLayoutに切り替えて、textViewにmesという名前をつけます。これ以外は、プログラムから表示します
<?xml version="1.0" encoding="utf-8"?>
<RelativeLayout xmlns:android="http://schemas.android.com/apk/res/android"
    xmlns:app="http://schemas.android.com/apk/res-auto"
    xmlns:tools="http://schemas.android.com/tools"
    android:layout_width="match_parent"
    android:layout_height="match_parent"
    tools:context=".MainActivity">

    <TextView android:text="@string/hello_world" android:layout_width="wrap_content"
        android:layout_height="wrap_content"
        android:id="@+id/mes"/>

</RelativeLayout>
今回のこのクラスは、GPS機能を使用する許可を取るためのクラスになります。OKならば次のクラスをIntent起動します。
package jp.co.etlab.emmail29;

import androidx.appcompat.app.AppCompatActivity;
import androidx.core.app.ActivityCompat;

import android.Manifest;
import android.content.Intent;
import android.content.pm.PackageManager;
import android.os.Build;
import android.os.Bundle;
import android.util.Log;
import android.widget.Toast;

public class MainActivity extends AppCompatActivity {

    private final int REQUEST_PERMISSION = 10;

    @Override
    protected void onCreate(Bundle savedInstanceState) {
        super.onCreate(savedInstanceState);
        setContentView(R.layout.activity_main);

        if(Build.VERSION.SDK_INT >= 23){
            checkPermission();
        }
        else{
            locationActivity();
        }
    }

    // 位置情報許可の確認
    public void checkPermission() {
        // 既に許可している
        if (ActivityCompat.checkSelfPermission(this,
                Manifest.permission.ACCESS_FINE_LOCATION)==
                PackageManager.PERMISSION_GRANTED){
            Log.d("CheckPermission", "check OK");

            locationActivity();
        }
        // 拒否していた場合
        else{
            requestLocationPermission();
        }
    }

    // 許可を求める
    private void requestLocationPermission() {
        if (ActivityCompat.shouldShowRequestPermissionRationale(this,
                Manifest.permission.ACCESS_FINE_LOCATION)) {
            ActivityCompat.requestPermissions(this,
                    new String[]{Manifest.permission.ACCESS_FINE_LOCATION},
                    REQUEST_PERMISSION);

        } else {
            Toast toast = Toast.makeText(this,
                    "許可されないとアプリが実行できません", Toast.LENGTH_SHORT);
            toast.show();

            ActivityCompat.requestPermissions(this,
                    new String[]{Manifest.permission.ACCESS_FINE_LOCATION,},
                    REQUEST_PERMISSION);

        }
    }

    // 結果の受け取り
    @Override
    public void onRequestPermissionsResult(
            int requestCode,
            String[] permissions,
            int[] grantResults) {

        if (requestCode == REQUEST_PERMISSION) {
            // 使用が許可された
            if (grantResults[0] == PackageManager.PERMISSION_GRANTED) {
                locationActivity();

            } else {
                // それでも拒否された時の対応
                Toast toast = Toast.makeText(this,
                        "これ以上なにもできません", Toast.LENGTH_SHORT);
                toast.show();
            }
        }
    }

    // Intent でLocation
    private void locationActivity() {
        Intent intent = new Intent(getApplication(), LocationActivity.class);
        startActivity(intent);
        MainActivity.this.finish(); //LocationActivityから戻ったら終わる
    }
}
ACCESS_FINE_LOCATIONがGPSを使用する許可ですので、それが許可されているかPERMISSION_GRANTEDされているか調べて、まだされていなければ、画面に許可申請を出します。それが、requestLocationPermission()の部分です。画面で許可か却下が押されると、onRequestPermissionsResult()のイベントが起きるので、そこで許可されたのが分かれば、locationActivity()を読んでIntent呼び出しを行います。
GPSを扱うクラスを別に作成するMainActivityで、権限の許可が出たときだけ、Intentで次のクラスを起動して、そこでGPSの処理をするようにしましょう。そこで LocationActivity という名前のクラスを追加します。
内容としては、GPSの変化を読み取る部分を記述して、変化があったらその緯度経度を取得し、GoogleのAPIにそれを渡し、住所を取得、表示するものです
package jp.co.etlab.emmail29;

import android.Manifest;
import android.content.Context;
import android.content.Intent;
import android.content.IntentSender;
import android.content.SharedPreferences;
import android.content.pm.PackageManager;
import android.content.res.Resources;
import android.graphics.Canvas;
import android.graphics.Color;
import android.graphics.Paint;
import android.location.Location;
import android.net.Uri;
import android.os.AsyncTask;
import android.os.Bundle;
import android.os.Handler;
import android.os.Looper;
import android.preference.PreferenceManager;
import android.util.Log;
import android.view.Menu;
import android.view.MenuItem;
import android.view.View;
import android.widget.TextView;
import android.widget.Toast;

import androidx.annotation.NonNull;
import androidx.annotation.Nullable;
import androidx.appcompat.app.AppCompatActivity;
import androidx.core.app.ActivityCompat;

import com.google.android.gms.common.api.ApiException;
import com.google.android.gms.common.api.ResolvableApiException;
import com.google.android.gms.location.FusedLocationProviderClient;
import com.google.android.gms.location.LocationCallback;
import com.google.android.gms.location.LocationRequest;
import com.google.android.gms.location.LocationResult;
import com.google.android.gms.location.LocationServices;
import com.google.android.gms.location.LocationSettingsRequest;
import com.google.android.gms.location.LocationSettingsResponse;
import com.google.android.gms.location.LocationSettingsStatusCodes;
import com.google.android.gms.location.SettingsClient;
import com.google.android.gms.tasks.OnCompleteListener;
import com.google.android.gms.tasks.OnFailureListener;
import com.google.android.gms.tasks.OnSuccessListener;
import com.google.android.gms.tasks.Task;

import java.text.DateFormat;
import java.text.SimpleDateFormat;
import java.util.Date;
import java.util.Timer;
import java.util.TimerTask;

public class LocationActivity extends AppCompatActivity {
    String _thisPlaceName="";
    private static final String TAG = "Emmail29";
    // Fused Location Provider API.
    private FusedLocationProviderClient fusedLocationClient;

    // Location Settings APIs.
    private SettingsClient settingsClient;
    private LocationSettingsRequest locationSettingsRequest;
    private LocationCallback locationCallback;
    private LocationRequest locationRequest;
    private Location location;

    private String lastUpdateTime;
    private Boolean requestingLocationUpdates;
    private static final int REQUEST_CHECK_SETTINGS = 0x1;
    private int priority = 0;
    private TextView textView;
    private String textLog;
    SharedPreferences spf;
    private View view;
    private Handler handler = new Handler();
    private AsyncGetGeo task;
    private String API_KEY = "";

    @Override
    protected void onCreate(@Nullable Bundle savedInstanceState) {
        super.onCreate(savedInstanceState);
        setContentView(R.layout.activity_main);

        textView = (TextView)findViewById(R.id.mes);
        view = new DigitalClockView(this);
        setContentView(view);
        Resources res = getResources();
        API_KEY = res.getString(R.string.google_maps_key);

        Timer timer = new Timer(false);
        timer.schedule(new TimerTask() {
            public void run() {
                handler.post(new Runnable() {
                    public void run() {
                        view.invalidate();
                    }
                });
            }
        }, 0, 500); //1秒だとズレるので500msecにする
        Log.i("EM", "onCreate()");

        requestingLocationUpdates = true;

        fusedLocationClient =
                LocationServices.getFusedLocationProviderClient(this);
        settingsClient = LocationServices.getSettingsClient(this);

        priority = 0;

        createLocationCallback();
        createLocationRequest();
        buildLocationSettingsRequest();
        //即計測開始
        startLocationUpdates();

        spf = PreferenceManager.getDefaultSharedPreferences(this);
    }

    // locationのコールバックを受け取る
    private void createLocationCallback() {
        locationCallback = new LocationCallback() {
            @Override
            public void onLocationResult(LocationResult locationResult) {
                super.onLocationResult(locationResult);
                Log.d("LocationActivity","createLocationCallback");

                location = locationResult.getLastLocation();

                lastUpdateTime = DateFormat.getTimeInstance().format(new Date());
                //updateLocationUI();
                callUri();
            }
        };
    }

    private void createLocationRequest() {
        locationRequest = new LocationRequest();

        if (priority == 0) {
            // 高い精度の位置情報を取得したい場合
            locationRequest.setPriority(
                    LocationRequest.PRIORITY_HIGH_ACCURACY);

        } else if (priority == 1) {
            // バッテリー消費を抑えたい場合、精度は100mと悪くなる
            locationRequest.setPriority(
                    LocationRequest.PRIORITY_BALANCED_POWER_ACCURACY);

        } else if (priority == 2) {
            // バッテリー消費を抑えたい場合、精度は10kmと悪くなる
            locationRequest.setPriority(
                    LocationRequest.PRIORITY_LOW_POWER);

        } else {
            // 受け身的な位置情報取得でアプリが自ら測位せず、
            // 他のアプリで得られた位置情報は入手できる
            locationRequest.setPriority(
                    LocationRequest.PRIORITY_NO_POWER);
        }

        // アップデートのインターバル期間設定
        // 単位:msec
        locationRequest.setInterval(60000);
        // このインターバル時間は正確です。これより早いアップデートはしません。
        // 単位:msec
        locationRequest.setFastestInterval(5000);

    }

    // 端末で測位できる状態か確認する。wifi, GPSなどがOffになっているとエラー情報のダイアログが出る
    private void buildLocationSettingsRequest() {
        LocationSettingsRequest.Builder builder =
                new LocationSettingsRequest.Builder();

        builder.addLocationRequest(locationRequest);
        locationSettingsRequest = builder.build();
    }

    // FusedLocationApiによるlocation updatesをリクエスト
    private void startLocationUpdates() {
        // Begin by checking if the device has the necessary location settings.
        settingsClient.checkLocationSettings(locationSettingsRequest)
                .addOnSuccessListener(this,
                        new OnSuccessListener<LocationSettingsResponse>() {
                            @Override
                            public void onSuccess(
                                    LocationSettingsResponse locationSettingsResponse) {
                                Log.i("debug", "All location settings are satisfied.");

                                // パーミッションの確認
                                if (ActivityCompat.checkSelfPermission(
                                        LocationActivity.this,
                                        Manifest.permission.ACCESS_FINE_LOCATION) !=
                                        PackageManager.PERMISSION_GRANTED
                                        && ActivityCompat.checkSelfPermission(
                                        LocationActivity.this,
                                        Manifest.permission.ACCESS_COARSE_LOCATION) !=
                                        PackageManager.PERMISSION_GRANTED) {

									//good by
									return;
                                }
                                fusedLocationClient.requestLocationUpdates(
                                        locationRequest, locationCallback, Looper.myLooper());

                            }
                        })
                .addOnFailureListener(this, new OnFailureListener() {
                    @Override
                    public void onFailure(@NonNull Exception e) {
                        int statusCode = ((ApiException) e).getStatusCode();
                        switch (statusCode) {
                            case LocationSettingsStatusCodes.RESOLUTION_REQUIRED:
                                Log.i("debug", "Location settings are not satisfied. Attempting to upgrade " +
                                        "location settings ");
                                try {
                                    // Show the dialog by calling startResolutionForResult(), and check the
                                    // result in onActivityResult().
                                    ResolvableApiException rae = (ResolvableApiException) e;
                                    rae.startResolutionForResult(
                                            LocationActivity.this,
                                            REQUEST_CHECK_SETTINGS);

                                } catch (IntentSender.SendIntentException sie) {
                                    Log.i("debug", "PendingIntent unable to execute request.");
                                }
                                break;
                            case LocationSettingsStatusCodes.SETTINGS_CHANGE_UNAVAILABLE:
                                String errorMessage = "Location settings are inadequate, and cannot be " +
                                        "fixed here. Fix in Settings.";
                                Log.e("debug", errorMessage);
                                Toast.makeText(LocationActivity.this,
                                        errorMessage, Toast.LENGTH_LONG).show();

                                requestingLocationUpdates = false;
                        }

                    }
                });

        requestingLocationUpdates = true;
    }

    private void stopLocationUpdates() {
        textLog += "onStop()\n";
        textView.setText(textLog);

        if (!requestingLocationUpdates) {
            Log.d("debug", "stopLocationUpdates: " +
                    "updates never requested, no-op.");


            return;
        }

        fusedLocationClient.removeLocationUpdates(locationCallback)
                .addOnCompleteListener(this,
                        new OnCompleteListener<Void>() {
                            @Override
                            public void onComplete(@NonNull Task<Void> task) {
                                requestingLocationUpdates = false;
                            }
                        });
    }

    @Override
    protected void onPause() {
        super.onPause();
        // バッテリー消費を鑑みLocation requestを止める
        stopLocationUpdates();
        Log.e("onPause","stopLocationUpdates");
    }

    private void callUri() {
        if (location != null) {
            String strLat = String.valueOf(location.getLatitude());
            String strLng = String.valueOf(location.getLongitude());
            String uri = "https://maps.googleapis.com/maps/api/geocode/json" +
                    "?latlng=" + strLat + "," + strLng + "&sensor=true&language=ja&key=" + API_KEY;
            Log.i("EM","beforeExcute");
            Log.i("EM",uri);
            //task status check
            if (task != null && task.getStatus() != AsyncTask.Status.FINISHED) {
                Log.i("EM", "task is in progress");
                return;
            }
            task = new AsyncGetGeo(this){
                @Override
                protected void onPostExecute(String result) {
                    _thisPlaceName = result;
                }
            };
            task.owner=this;
            task.execute(uri);
        } else {
            Log.i("EM","location is null");
        }
    }

    @Override
    public boolean onCreateOptionsMenu(Menu menu) {
        // Inflate the menu; this adds items to the action bar if it is present.
        getMenuInflater().inflate(R.menu.menu_main, menu);
        MenuItem target = menu.add(Menu.NONE,0,0,"自宅に電話");
        target.setShowAsAction(MenuItem.SHOW_AS_ACTION_IF_ROOM);
        target =menu.add(Menu.NONE, 1, 1, "帰るメール");
        target.setShowAsAction(MenuItem.SHOW_AS_ACTION_IF_ROOM);
        target=menu.add(Menu.NONE,2,2,"自宅の地図");
        target.setShowAsAction(MenuItem.SHOW_AS_ACTION_IF_ROOM);
        target=menu.add(Menu.NONE,3,3,"地名の再取得");
        target.setShowAsAction(MenuItem.SHOW_AS_ACTION_IF_ROOM);
//        target=menu.add(Menu.NONE, 4, 4, "設定");
//        target.setShowAsAction(MenuItem.SHOW_AS_ACTION_IF_ROOM);
        return super.onCreateOptionsMenu(menu);
    }

    @Override
    public boolean onOptionsItemSelected(MenuItem item) {
        Intent i = null;
        SharedPreferences spf = PreferenceManager.getDefaultSharedPreferences(this);

        switch(item.getItemId()) {
            case 0:
                // 電話番号
                String emtelValue = spf.getString("emtel", "");
                i = new Intent(Intent.ACTION_VIEW, Uri.parse("tel:"+emtelValue));
                break;
            case 1:
                String emmailValue = spf.getString("emmail", "");
                String emmttlValue = spf.getString("emmttl", "帰るメール");
                String emmcmtValue = spf.getString("emmcmt", "そろそろ帰ります");
                if (!_thisPlaceName.isEmpty()) {
                    emmcmtValue += "\n\n現在位置:" + _thisPlaceName;
                }
                i = new Intent(Intent.ACTION_SENDTO, Uri.parse("mailto:" + emmailValue));
                i.putExtra(Intent.EXTRA_SUBJECT, emmttlValue);
                i.putExtra(Intent.EXTRA_TEXT, emmcmtValue);
                break;
            case 2:
                String myhomeValue = spf.getString("emadr", "鹿児島市役所");
                i = new Intent("android.intent.action.VIEW", Uri.parse("geo:0,0?q="+myhomeValue+"?z=20"));
                break;
            case 3:
                callUri();
                break;
            case R.id.action_settings:
                //設定画面
                i = new Intent(this, MyPrefs.class);
                break;
        }
        if (i != null)
            startActivity(i);
        return true;
    }

    class DigitalClockView extends View {
        final DateFormat FORMAT_CLOCK = new SimpleDateFormat("HH:mm:ss");
        final DateFormat FORMAT_CALENDAR = new SimpleDateFormat("yyyy/M/d(E)");
        final Paint paint = new Paint();

        public DigitalClockView(Context context) {
            super(context);
            setFocusable(true);
            setWillNotDraw(false);
            paint.setTextSize(48);
            paint.setTextAlign(Paint.Align.CENTER);
            setBackgroundColor(Color.BLACK);
            //Log.i("EM", "DigitalClockView()");
        }

        @Override
        protected void onDraw(Canvas canvas) {
            //Log.i("EM", "onDraw()");
            final String calText = FORMAT_CALENDAR.format(new Date());
            final String timeText = FORMAT_CLOCK.format(new Date());
            paint.setColor(Color.WHITE);
            paint.setTextSize(72);
            canvas.drawText(calText, canvas.getWidth() / 2, canvas.getHeight() / 2 - 48, paint);
            canvas.drawText(timeText, canvas.getWidth() / 2, canvas.getHeight() / 2 + 48, paint);
            if (location != null) {
                canvas.drawText(String.valueOf(location.getLatitude()) + ":" + String.valueOf(location.getLongitude()),
                        canvas.getWidth() / 2, canvas.getHeight() / 2 + 178, paint);
            }
            paint.setTextSize(48);
            canvas.drawText(_thisPlaceName, canvas.getWidth() / 2, canvas.getHeight() / 2 + 250, paint);
        }
    }

}
onCReate()で行なっているのは、activity_mainの表示と、デジタル時計の表示クラスの呼び出しと、Google APIのAPI_KEYの読み込み、GPSの割り込みの開始設定、設定値読み込みのプリファレンスの初期化です。
GPSの扱いは、バージョンが進むに従って、徐々に変化してきました。2020年現在では、FusedLocationProviderClientを使っています。今回の割り込みはpriority=0でやっているので、わりと速い割り込みです。電池の消費を考えたら2とか3でも構いません。
createLocationCallback()でGPSの変化を受信した時のcallbackルーチンの宣言を行なっています。そのルーチンの中でcallUri()を行い、そこでGoogle APIの呼び出しを行います。
startLocationUpdates()で、計測を開始しますが、その中でまたACCESS_FINE_LOCATIONを聞いています。本来必要ないのですが、これを書かないとコンパイラが怒るので、書いてあります。GPS割り込みの設定がうまく行った時、いままで設定したcallback等が動き続けるように要求をだします。一発ではなく、何回でも受け付けます。
また、止める方の設定も書いてあります。onPauseのイベントで、removeLocationUpdates()して、割り込みを止めます。
さて、callUri()は、少しばかり面倒です。この処理は別クラスの呼び出しを行なっていますが、別クラスでは表示を行いたくないので、クラスの終了のタイミングのonPostExecute()で処理結果をこのクラスで受け取り、表示しています。別クラスは後で説明します。
緯度経度は自前のセンサーで取得できますが、住所を取得するのはGoogle Mapの助けをもらわないとできません。そこでGoogle Apiで緯度経度を住所に変換してくれるサービスを利用します。
まずは、Googleアカウントが必要ですので、そこから始めます。Gmailを使っているのであればそれで十分です。
https://console.developers.google.com/ で まずプロジェクトを作成します。すでにあるときに追加するときはGoogle APIs のアイコンの横の プロジェクト名の右の▼アイコンを押して、新しいプロジェクトを追加してください

このプロジェクト名自体はあまり関係ないので、なんでも構いません。今作ったプロジェクトを選んで、APIを有効にするをクリックします。あるいは、メニューのAPIとサービスからライブラリを選んでもかまいません。
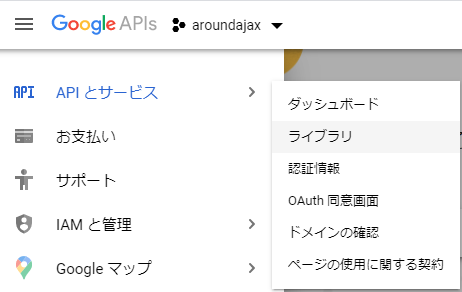
そこでgeocoding APIを有効にしてください。これは住所と緯度経度の変換を行うAPIです。

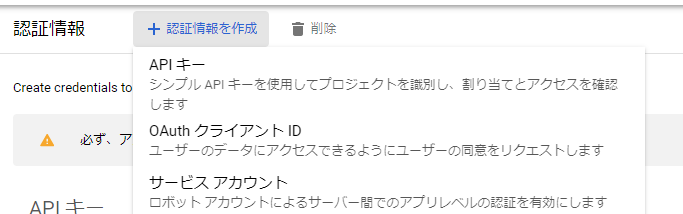
ライブラリを選択する要領で、メニューから認証情報をクリックしてください。そこで認証情報を作成を押して、APIキーを選択します。キーを制限で、今許可したGeocoding APIを選択します。するとすでにキーが作成されています。AIzaで始まるキーです。このキーは後ほど使いますのでコピーしておいてください。
今回はそのキーをgoogle_maps_api.xmlに保存します。ソースコードの中に直接入れても構いませんが、今回はこうします。android studioの左のprojectのツリーの中のres->valuesで右クリックして new->values resource fileを選び、file name: google_maps_api source: debug としてxmlファイルを作成し中身を以下のようにします。
<?xml version="1.0" encoding="utf-8"?>
<resources>
    <string name="google_maps_key" templateMergeStrategy="preserve" translatable="false">AIzaで始まるキー</string>
</resources>
さきほどgoogle apiで作ったAIzaで始まるキーをここに貼り付けます。これで、先程のLocationActivityのcallUriのAPI_KEYが埋まります。これが無いと、Googleは反応してくれません。
LocationActivityを追加したときのように、今度は AsyncGetGeoクラスを追加します。このクラスはWEB APIに対してrequestを行い、その返事をjsonで受信して、必要なところだけ呼び出し元クラスに返却するものです。
このソースではAsyncTaskを使用します。この手法は、いずれdeprecatedになるので、その時までの手法です。別の解説でvolleyを使ったものがありますが、そちらでも構いません。AsyncTaskはWEBにリクエストを出して、ある程度の時間が掛かってもその返事のレスポンスを受け取る方式です。人間にとってはさした時間ではありませんが、コンピュータにとって、この時間は長いので特別の方法で受信しないと、メインのプログラムが止まってしまいますので、非同期で受信するように作ります。
package jp.co.etlab.emmail29;

import android.app.Activity;
import android.os.AsyncTask;
import android.util.Log;

import org.json.JSONArray;
import org.json.JSONException;
import org.json.JSONObject;

import java.io.BufferedInputStream;
import java.io.BufferedReader;
import java.io.IOException;
import java.io.InputStream;
import java.io.InputStreamReader;
import java.net.HttpURLConnection;
import java.net.MalformedURLException;
import java.net.URL;

public class AsyncGetGeo extends AsyncTask<String, Void, String> {
    public Activity owner;
    private String ReceiveStr;
    public AsyncGetGeo(Activity activity) {
        owner = activity;
    }

    @Override
    protected String doInBackground(String... uri) {
        URL url = null;
        try {
            Log.i("EM", "doInBackground");
            Log.i("EM",uri[0]);
            url = new URL(uri[0]);
        } catch (MalformedURLException e) {
            e.printStackTrace();
        }
        HttpURLConnection urlConnection = null;
        try {
            urlConnection = (HttpURLConnection) url.openConnection();
        } catch (IOException e) {
            e.printStackTrace();
        }
        ReceiveStr="";
        try {
            InputStream in = new BufferedInputStream(urlConnection.getInputStream());
            String response = readStream(in);
            ReceiveStr = json_parse(response);
        } catch (IOException e) {
            e.printStackTrace();
        } finally {
            urlConnection.disconnect();
        }
        return ReceiveStr;
    }

    private String readStream(InputStream is) throws IOException {
        StringBuilder sb = new StringBuilder();
        BufferedReader r = new BufferedReader(new InputStreamReader(is),1000);
        for (String line = r.readLine(); line != null; line =r.readLine()){
            sb.append(line);
        }
        is.close();
        return sb.toString();
    }

    private String json_parse(String str) {
        try {
            String res = "";
            String preNum = "";
            String nowType = "";
            String nowNum = "";
            JSONObject rootObject = new JSONObject(str);
            JSONArray eventArray = rootObject.getJSONArray("results");
            for (int i = 0; i < eventArray.length(); i++) {
                JSONObject jsonObject = eventArray.getJSONObject(i);
                JSONArray compArray = jsonObject.getJSONArray("address_components");
                String preType = "";
                for (int j = 0; j < compArray.length(); j++) {
                    JSONObject addrObject = compArray.getJSONObject(j);
                    JSONArray typesArray = addrObject.getJSONArray("types");
                    nowType="";
                    String types = typesArray.getString(0);
                    if (!types.equals("")) {nowType=types;}
                    if(nowType.equals("")) continue;
                    if(nowType.equals("country")) break;
                    if(nowType.equals("route")) continue;
                    nowNum = nowType.substring(nowType.length()-1);
                    String longName = addrObject.getString("long_name");
                    if (preNum.equals("5") && nowNum.equals("4")) {
                        res = ('-' + longName);
                    }else if (preNum.equals("4") && nowNum.equals("3")) {
                        res = (longName + '-' + res);
                    } else {
                        res = longName + res;
                    }
                    preType = nowType;
                    preNum = nowNum;
                }
                if (nowType.equals("country")) {
                    return res;
                }
            }
            return "";
        } catch (JSONException e) {
            // TODO Auto-generated catch block
            e.printStackTrace();
        }
        return "";
    }
}
doInBackGroundで リクエストして、レスポンスを ストリームとして受信します。Googleに緯度経度を指定して渡し、その結果をjsonで受信します。
json_parse()の中でやっているのは、以下のようなgoogle apiからのレスポンスのjsonの先頭に返ってくる配列の中のaddress_componentsのtypesの先頭がcountryになるまで住所のlong_nameを逆順に積み上げて行くことです。たまにこの法則に合っていないと、うまく取れないこともあります。
{
   "plus_code" : {
      "compound_code" : "HHV3+FV 日本、鹿児島県鹿児島市",
      "global_code" : "8Q3GHHV3+FV"
   },
   "results" : [
      {
         "address_components" : [
            {
               "long_name" : "25",
               "short_name" : "25",
               "types" : [ "premise" ]
            },
            {
               "long_name" : "21",
               "short_name" : "21",
               "types" : [ "political", "sublocality", "sublocality_level_4" ]
            },
            {
               "long_name" : "東千石町",
               "short_name" : "東千石町",
               "types" : [ "political", "sublocality", "sublocality_level_2" ]
            },
            {
               "long_name" : "鹿児島市",
               "short_name" : "鹿児島市",
               "types" : [ "locality", "political" ]
            },
            {
               "long_name" : "鹿児島県",
               "short_name" : "鹿児島県",
               "types" : [ "administrative_area_level_1", "political" ]
            },
            {
               "long_name" : "日本",
               "short_name" : "JP",
               "types" : [ "country", "political" ]
            },
            {
               "long_name" : "892-0842",
               "short_name" : "892-0842",
               "types" : [ "postal_code" ]
            }
         ],
このjsonデータでは「鹿児島県鹿児島市東千石町21-25」となります。
続いて、画面にメニューを追加します。最初に画面を作るときに、Empty画面で作っているので画面にはタイトルはあるものの、メニューがありません。そこでメニューを追加します。
android studioの左のprojectのツリーの中のresフォルダーを選び、右クリックして、newの中のresource directoryを選んで menu というディレクトリを resource typeをmenuとして作成します。そして、の作成した menu フォルダーの中に source set: mainで file name: menu_main を作成します。
このリソースファイルの内容がメニューの初期値になります。次のように作成してください
<?xml version="1.0" encoding="utf-8"?>
<menu xmlns:android="http://schemas.android.com/apk/res/android"
    xmlns:app="http://schemas.android.com/apk/res-auto">
    <item android:id="@+id/action_settings" android:title="@string/action_settings"
        android:orderInCategory="100" app:showAsAction="never" />
</menu>
ついでに、文字列設定を追加します。
android studioの左のprojectのツリーの中のresフォルダーのvaluesフォルダーのstringを開きます。そして内容を以下のように変更してください。
<resources>
    <string name="app_name">Emergency Call</string>
    <string name="app_name2">Emergency Call</string>
    <string name="action_settings">設定</string>
    <string name="app_name3">設定</string>
    <string name="hello_world">._.</string>
</resources>
このファイルはLocationActivityの中のonCreateOptionsMenu()で使用します。画面にメニューを追加し、onOptionsItemSelected()でメニューが押された時の処理分岐を行います。Empty画面で作成したときはこの部分が自動作成されないので、自分で追加してください。
onOptionsItemSelected()の中で設定メニューが選択された時に、設定画面を開くようにしています。そこで設定画面を作成します。
LocationActivityを追加した時と同じように、プロジェクトのjavaにMyPrefsクラスを追加します。
package jp.co.etlab.emmail29;

import android.app.Activity;
import android.content.SharedPreferences;
import android.os.Bundle;
import android.preference.EditTextPreference;
import android.preference.PreferenceFragment;

public class MyPrefs extends Activity {
    @Override
    public void onCreate(Bundle savedInstanceState) {
        super.onCreate(savedInstanceState);
        getFragmentManager().beginTransaction().replace(android.R.id.content, new PrefsFragment()).commit();
    }

    public static class PrefsFragment extends PreferenceFragment implements SharedPreferences.OnSharedPreferenceChangeListener {
        @Override
        @Deprecated
        public void onCreate(Bundle savedInstanceState) {
            super.onCreate(savedInstanceState);
            addPreferencesFromResource(R.xml.preference);
            //現在値表示
            EditTextPreference editPref = (EditTextPreference) findPreference("emtel");
            if (editPref.getText()!=null)
                editPref.setSummary(editPref.getText());
            editPref = (EditTextPreference) findPreference("emmail");
            if (editPref.getText()!=null)
                editPref.setSummary(editPref.getText());
            editPref = (EditTextPreference) findPreference("emmttl");
            if (editPref.getText()!=null)
                editPref.setSummary(editPref.getText());
            editPref = (EditTextPreference) findPreference("emmcmt");
            if (editPref.getText()!=null)
                editPref.setSummary(editPref.getText());
            editPref = (EditTextPreference) findPreference("emadr");
            if (editPref.getText()!=null)
                editPref.setSummary(editPref.getText());
        }

        @Override
        public void onResume() {
            super.onResume();
            getPreferenceManager().getSharedPreferences().registerOnSharedPreferenceChangeListener(this);

        }

        @Override
        public void onPause() {
            getPreferenceManager().getSharedPreferences().unregisterOnSharedPreferenceChangeListener(this);
            super.onPause();
        }

        @Override
        public void onSharedPreferenceChanged(SharedPreferences arg0,
                                              String arg1) {
            // TODO 自動生成されたメソッド・スタブ
            EditTextPreference editPref = (EditTextPreference) findPreference((CharSequence) arg1);
            // Preferenceのサマリーを変更
            editPref.setSummary(editPref.getText());
        }
    }

    public void setChanged(boolean b) {
        // TODO 自動生成されたメソッド・スタブ

    }
}
さて、この設定画面は、xmlで定義する必要があります。そこでresフォルダーにxmlフォルダーを追加します。
フォルダーを追加したら、その中にpreferenceファイルを追加します。
<?xml version="1.0" encoding="utf-8"?>
<PreferenceScreen xmlns:android="http://schemas.android.com/apk/res/android">
    <PreferenceCategory
        android:title="緊急連絡先電話">
        <EditTextPreference
            android:key="emtel"
            android:title="電話番号"
            android:summary="半角入力"
            android:dialogTitle="緊急連絡先電話番号" />
    </PreferenceCategory>
    <PreferenceCategory
        android:title="連絡先メール">

        <EditTextPreference
            android:key="emmail"
            android:title="連絡先メールアドレス"
            android:summary="半角入力"
            android:dialogTitle="連絡先メールアドレス" />
        <EditTextPreference
            android:key="emmttl"
            android:title="メールタイトル"
            android:summary="30文字以内"
            android:maxLength="30"
            android:dialogTitle="メールタイトル" />
        <EditTextPreference
            android:key="emmcmt"
            android:title="メール内容"
            android:summary="100字以内"
            android:maxLength="100"
            android:dialogTitle="メール内容" />
    </PreferenceCategory>

    <PreferenceCategory
        android:title="帰宅先住所">
        <EditTextPreference
            android:key="emadr"
            android:title="自宅住所"
            android:summary="市から番地まで入力"
            android:dialogTitle="自宅住所" />

    </PreferenceCategory>
</PreferenceScreen>
この画面をMyPrefsで呼び出して、画面を表示、設定値の入力を行います。ここで入力したデータをLocationActivityのメニュー選択時に使用します。
さて、これでソースと画面は出来上がったのですが、まだ実行できません。このアプリでは複数のActivityを利用しています。
最初に MainActivity。そこで、パーミッションチェックがOKならばLocationActivity。また設定画面では MyPrefsと3つのActivityが存在します。そこで、これらを登録しておかなければいけません。
これらをAndroidManifestファイルに宣言します。
    <application
        android:allowBackup="true"
        android:icon="@mipmap/ic_launcher"
        android:label="@string/app_name"
        android:roundIcon="@mipmap/ic_launcher_round"
        android:supportsRtl="true"
        android:networkSecurityConfig="@xml/network_security_config"
        android:theme="@style/AppTheme">
        <activity android:name=".MainActivity">
            <intent-filter>
                <action android:name="android.intent.action.MAIN" />

                <category android:name="android.intent.category.LAUNCHER" />
            </intent-filter>
        </activity>
        <activity android:name=".LocationActivity"
            android:label="@string/app_name2"/>
        <activity android:name=".MyPrefs"
            android:label="@string/app_name3"/>
        <meta-data
            android:name="com.google.android.geo.API_KEY"
            android:value="@string/google_maps_key" />
    </application>
1つ目のActivityは.MainActivityで、2つ目、3つ目を追加します。
このファイルには、このアプリで使用する資源について色々記述します。一緒に説明します。まず、networkSecurityConfigを指定します。これは使用するWEBサイトを予め宣言するもので、ここではそのファイル名を宣言します。そして以前preferenceを作ったところにnetwork_security_configファイルを作成します。
<?xml version="1.0" encoding="utf-8"?>
<network-security-config>
    <domain-config cleartextTrafficPermitted="true">
        <domain includeSubdomains="true">maps.googleapis.com</domain>
    </domain-config>
</network-security-config>
ここでgoogle apiのURLを宣言しておきます。
続いて、Google APIから取得したgoogle_maps_keyもmeta-dataで宣言します。
このソースを入れただけでは動きません。先に説明したGoogle APIを有効にする必要があります。またAIzaで始めるKEYも取得して、ファイルに記述しておく必要があります。また登録の際にクレジットカードの登録も要求されます。私はもう随分使っているので、毎月の請求書がpdfで送られてくるのがドキドキです。今の所0円請求書です。このように実験で使っている分にはぜんぜん大丈夫ですが、gmailのアカウントで使用しているものが全部まとまって来ますので、やはりどきどきです。普通1ヶ月$200の無料クレジットがついているので大丈夫ですが、Geocoding,Geolocation,TimeZoneでは40,000呼び出しを超えると、1000回あたり、$5.00掛かります。無料クレジットがなければだいたい1ヶ月500円くらい掛かっています。つまり月1000回はリクエストが来ています。(これだけでなく星占いなどでも使用中)
実行はできるだけ野外でお願いします。みちびき対応であれば商店街でもなんとかなりますが、できるだけビルに囲まれていないところで行いましょう。確実なGPS衛星が3つは必要です。歩きまわるとどんどん住所が変わると思います。ということで請求が怖いのでapkは公開しませんが、ご自分のカードでやってみてください。
さて、このアプリでは設定で住所、電話番号、メールアドレスを入力するようになっています。住所を入れておくと、「自分の地図」を押した時に地図が表示されます。電話番号を入れておくと「自宅に電話」で電話が掛かります。メールアドレスを入れておくと、定形のタイトルとメッセージを送ることができます。Lineを使う前は帰るメールで使っていました。地名の再取得で再度住所を取得します。
今回の通信のやり方や設定に関してはどんどん変わっていくものなので、その都度確認してからやってみましょう。去年作ったものが今年はだめなんてことがよくあります